As we all know we can use roll-up summary field logic only for the master-detail relationship, but in case you have the business requirement to implement the same logic for lookup relationship then you have to think of an alternative way to cater to the requirement, there can be multiple ways to implement but in this blog, we will use a trigger to implement roll-up summary field logic. So before wasting any time, let's get started.😊 Read till the end to know the bonus tip.

Use Case Example :
There are two objects one is Account and another object is Contact, as you all know Account is the parent object and Contact is the child object and they share the lookup relationship between them.
.
There are MaxSalary__c and MinSalary__c custom fields on Account Object.MaxSalary__c field should be updated with a value that is the maximum of all the salaries(salary__c) of its related contacts and MinSalary__c field should be updated with the value that is the minimum of all the salaries(salary__c) of its related contacts list. So in short the highest and lowest salary amount among all the contacts should be updated on its respective Account.
Solutions :
Before diving directly into code, identify the below points from the given requirement scenario.
1.Object on which Trigger is fired.
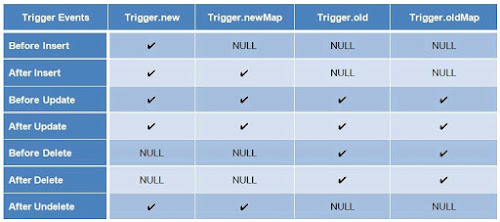
2.Which Trigger Events should be used and Why?
3.Objects, fields, and conditions on which DML operations need to be performed.
The trigger has to be written on the Contact object and as per the requirement we are performing calculations on the trigger after the user submits or update or delete or undelete the contact (salary field ) record, hence we have to use after insert, after update, after delete and after undelete trigger events.
There are two approaches to solve this problem one is using the inbuilt aggregate function in salesforce and the second one is to build your own logic for calculating maximum salary and minimum salary.
The great news for all of you is we will try to solve the scenario using both methods.
Solution 1:Using Aggregate functions min() and max() to calculate the maximum and minimum salary.
Code:
trigger MaxMinSalaryCal on Contact(after insert,after update,after delete,after undelete) {
Set<Id> accids= new Set<id>();
List<Account> updateList=new List<Account>();
if(Trigger.isInsert|| Trigger.isUpdate||Trigger.isUndelete){
for(Contact c:trigger.new)
{
accids.add(c.accountid);
} }
if(Trigger.isDelete){
for(Contact c1:Trigger.old){
accids.add(c1.accountid);
}
}
for(AggregateResult result:[select accountid accid,max(salary__C) maxSalary,min(salary__c) minsalary from contact where accountid in: accids group by accountid])
{
Account a= new Account();
a.MaxSalary__c=(Decimal) result.get('maxSalary');
a.MinSalary__c=(Decimal)result.get('minsalary');
a.id=(Id)result.get('accid');
updateList.add(a);
}
update updateList;
}
To know more about Aggregate Functions, Please click the below link of an official document by Salesforce
Solution 2:Without using Aggregate Functions
The crux of the logic is arranging the salary of all contacts in descending order and then the first element of the list will contain the max amount(i.e max salary) and the last element of the list will contain the min amount(i.e minimum salary in this case)
Code:
trigger MaxMinSalaryCal on Contact(after insert,after update,after delete,after undelete){
Set<Id> accids= new Set<id>();
List<Account> updateList=new List<Account>();
if(Trigger.isInsert|| Trigger.isUpdate||Trigger.isUndelete){
for(Contact c:trigger.new)
{
accids.add(c.accountid);
} }
if(Trigger.isDelete){
for(Contact c1:Trigger.old){
accids.add(c1.accountid);
}
}
List<Account> acclist= new List<Account>();
acclist=[select id,name ,MaxSalary__c ,(select id,salary__c, lastname from contacts order by
salary__c desc ) from account where id in :accids];
for(Account a:acclist){
List<Contact> conlist=a.contacts;
a.MaxSalary__c=(Decimal)conlist.get(0).salary__C;
a.MinSalary__c=(Decimal)conlist.get(conlist.size()-1).salary__c;
updateList.add(a);
}
if(updatelist.size()>0 && updatelist!=null){
update updateList;
}}
Thanks for reading my blog and please check out my previous blog (link mentioned below) on the trigger to learn all basic concepts about the trigger.
BONUS TIP: To implement roll-up summary logic using a trigger is the most frequently asked scenario question on triggers in salesforce developer interviews. Do prepare more for such scenario examples for the interviews.
Stay Tuned and Keep Learning and sharing your knowledge as sharing is Caring.